GROOMS GARDENING: Pollinate amaryllis to grow bulbs from seeds
Published 1:00 pm Saturday, April 17, 2021
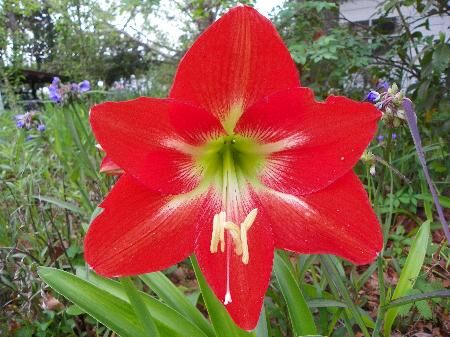
- Susan Grooms | Submitted PhotoSingle amaryllis flower. The pistol is drooping down and is not ready to be pollinated until it turns upwards and splits into three lobes.
We are starting the third full week of April and are in full swing with spring flowers.
Pollen has been heavy this season, coating cars, exterior buildings and everything outside.
Trending
Pecan trees are starting to bud out and they produce tons of pollen when they bloom. Live oaks are just finishing up their bloom cycle, some species of oak have yet to bloom.
Both trees produce a group of catkins as their pollinators. That is what we see and say the tree is blooming. The pollen of both is airborne and is carried by air currents.
Amaryllis bulbs are blooming now. They are bursting up with huge beautiful blooms. Each one usually has four flowers at the top of its scape. Each bloom is beautiful when viewed from any direction.
Pollinate your amaryllis flowers to produce seed and you can grow your own bulbs from seed.
The first year the seedlings will sprout and grow a small peanut-sized bulb and a strap or two of foliage. The second year, given plenty of sunshine and food it will grow to a golf ball-size or bigger. The third year it will grow into a full sized bulb. Some bulbs will bloom at the third year, but most will not bloom until the fourth through sixth year. It all depends on the amount of light and food the little bulb receives.
To pollinate one flower on the scape, take a pollen bearing stamen from one bulb’s flower and rub it on the receptor pistol of the flower of another bulb.
Trending
The pistol must be ready to pollinate or the process will not work. When the pistol is ready to receive pollen, it will turn upwards, split into three small lobes and produces a sticky substance to hold the pollen to the receivers.
A fertilized flower will fade away and at the base of its stem a small swelling will begin to occur. Over the next three to four weeks or so, the seed will develop into a walnut-sized seed pod. When the seed have matured, the pod will turn tan and develop a small split at the top, along the seam. The seed must be planted shortly after you gather them, the germination rate declines greatly if they are stored more than a few weeks.
The seed do well planted in the soil or in a container. They must be kept lightly moist until a few weeks after germination. When planting the seed, scatter them over the surface and sprinkle a slight amount of soil over the tops. All of the seed do not have to be covered by soil.
The seed are round, black silky discs, the germ is in the center. You can feel the slightly swollen spot in the center of the dry, silky discs. Plant thickly, when the seed germinates, little slim straps of foliage will come up. They look like grass at first, but the flatness of the foliage will let you know it’s not.
If planting outside in the ground, you must remember that slugs, snails and other things will eat the tender baby sprouts. If I plant in the dirt, I usually sprinkle Sevin all around the bed to keep down hungry pests. The Sevin may have to be reapplied after each rain. You will not be poisoning pollinators as there is nothing to attract them to a bed of dirt or a bed of sprouted seed.
I have a small sandwich meat container that I planted seeds, from one pod, in about three years ago. They have never made it into the soil and one bulb has excelled and is blooming for its first time this spring. Most of the other bulbs in the little container have not grown much at all due to the confined space. Amaryllis like to touch shoulders with their sisters and will produce more flowers if slightly pot-bound.
This may sound complicated but it is an extremely simple process, fertilization takes about five seconds after you identify a flower ready to be pollinated. You have nothing to lose, if you are not successful, try the process on other amaryllis flowers.
Well, I have talked enough about amaryllis growing. I am out of space and will see you next week.
Susan Grooms lives and gardens in Lowndes County.